Adam Goff
There are a few key tricks that I have found make an effective mark. Some are
commonly talked about and pretty well agreed. I do think that not all of these
are universally agreed. This is mostly a list of key points, rather than in
depth on each one.
The first is mental. It’s very easy to relax when you get to a mark. It’s
important to remind yourself that you are responsible for more of the field
than any other single defender on the field. I see players lose this focus at
the biggest points in the biggest games. There’s no trick to this: you simply
can’t relax when you are marking; any good thrower will recognize that you
have let down your guard. The more intense you are, the better your mark.
Sidelines can be key in this. Get on the marker—provide information about
what’s going on, but don’t just let the marker relax. This isn’t the time
rest.
The second is also mental. As a marker, you cannot do everything. Do not try.
It’s very easy at the highest levels to start to think you can do more than
you can. The downfield defender that spends too much time worrying about other
players usually gets beat. The same is true for the marker. If you worry about
trying to block the thrower from getting the disc to the whole field, you will
likely not stop anything. You will be at the mercy of the throwers fakes. I
usually tell players that you can stop 90° of the field, and you can harass
throws in a little more (maybe 45-60° more). But you cannot stop a good
thrower from throwing into even half of the field. In the diagram, T is
thrower and M is marker, and the force is backhand. The dark blue is the area
that you should block—definitely. You should try to harass throws in the light
blue, but not at too much risk to your dark blue area.
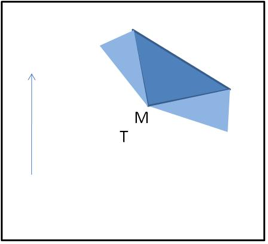 Figure No. 1
The third is positioning. I believe that most marks, even at all but the very
top levels, are too far away from the thrower. It seems to be common practice
to back up when there’s a risk of, or experience with, getting broken.
Typically, movement (being on your toes, bouncing with the thrower pivots)
does a better job of keeping you from giving up that throw. It’s important to
have good balance and body position (arms low, knees over feet).* As a rule, I
try to be about 18" to 2’ from the thrower. Sometimes even closer. This is a
change from what beginners or even intermediate players are taught, but it’s
critical throughout.
The fourth is mental—again. As a marker, I want the thrower thinking about me.
I know that I am rarely aware of the marker when I’m throwing. When I’m not
aware of the marker it makes me very, very comfortable. Since I don’t want the
thrower comfortable when I’m marking, I will change things. I will change the
volume I’m counting. I will vary my distance a bit between stall
counts—shifting forward and back, and between marks. I will sometimes move my
arms more and sometimes less. I’ll yell different things to the defenders
around me.
* Zaslow and Parinella wrote a great guide to marking in “Ultimate Techniques
and Tactics.” Balance and arm position is key in this—I’d suggest giving it a
read if you haven’t. I didn’t cover items like balance, arm position, or
impact of field position. It’s covered very well in their book.
Ben van Heuvelen
Beyond the fundamentals of marking—getting low with the hips, staying
balanced, keeping arms wide—here are a few “advanced fundamental” techniques.
1. Chin up, eyes on the chest. My hand is much more likely to find its
way in front of the disc when I’m only “looking” with my peripheral vision. To
be honest, I’m not sure why this works so well. In part, I think it’s because
good throwers use disc fakes to get you out of position. If you’re not looking
at the disc, you’re less likely to get faked out by it. Also, there is so much
useful visual information to take in—where the thrower is looking, where his
chest is facing, whether he’s gripping forehand or backhand—and you can only
see all of that by using peripheral vision.
2. Step backward to prevent the break. Say I’m forcing forehand, and a
thrower tries to break me with an inside-out forehand. If I lunge sideways or
forward, closing the distance between me and the thrower, then he has a chance
to reach forward and release the disc past my hand. Against a good thrower, I
have no chance at a block, and he’ll probably draw a foul, too. So, instead, I
want to open my hips and lunge laterally and backwards. I deny him the ability
to release the disc past my arm, I don’t let him draw the foul, and I give
myself an extra quarter of a second to locate the disc and move my hand to
block it.
3. Straight-up mark. A surprising number of club players put on poor
straight-up marks because they seem to think the purpose of a straight-up mark
is to get a hand-block. The strategic purpose of a flat mark, however, is
usually that we want to prevent throws to the middle of the field—forcing
throwers to spray discs wide, into positions where the defense can use the
sideline as an extra defender. My rule of thumb for a good flat mark is
“mirror shoulders.” At all times, my shoulders will be flush with the
thrower’s shoulders.
4. The half-flat mark. If a thrower (or a team) is hucking successfully,
and/or if they’re beating us with yardage-gaining breaks, one way to respond
is by adjusting the angle of our marks. In the basic forehand force we all
learned on the first day of ultimate practice, the marker sets up at a
45-degree angle to the sideline—putting himself in a position where he’s able
to shift to take away either the inside-out forehand or the around backhand.
With the half-flat mark, the thrower concedes the yardage-losing around throw.
He sets up entirely perpendicular to the sideline, as if he were marking
straight-up—except here he’ll shuffle a half step to his right (assuming a
forehand force), such that his left shoulder is even with the thrower’s chin.
As the thrower pivots, the marker will maintain this relative positioning.
There are three advantages to this tactic: A. The marker can respond to a “no
huck” with a half-step lateral shuffle, easily and quickly, without having to
rotate around or lunge over the thrower. B. The marker doesn’t have to move as
much to take away the inside-out throw. C. Although the marker is conceding an
around pass to the backfield, he is more effectively taking away a yardage-
gaining around pass.
5. Be unpredictable. Vary your distance from the thrower, keep your hands
frantic, add an extra half-second to your stall count (“Stalling one, two, two
and a half, three”*)—anything, within the limits of legal play and good
sportsmanship, to get your thrower thinking more about your mark and less
about his throw.
* I wouldn’t use this particular one outside of summer league.
Kirk Savage
I really enjoy marking—particularly in the zone of a 1-3-3. Marking is a very
important part of the game that often goes unnoticed or is an afterthought in
defensive play. Teams usually pay some lip service to marking strategy
(forcing flick or middle or straight-up), but that tends to be about it.
Unfortunately, common practice is that the marker will rest on the mark. They
use the mark as a chance to get their breath and prepare for another defensive
run. This is a big mistake and passes up a great opportunity to create added
defensive pressure.
I am not tall—at 5'9" I do not have a huge wingspan to shut down throwing
options. However, I do have a few little tricks when it comes to marking to
improve my success rate.
My favourite strategy is to start counting calmly…stalling 1, 2, 3, 4, and
then once the count starts to get higher, I start to count louder and more
frantically. By the time I get to stalling 9, and hopefully 10, the thrower is
freaked out and everyone knows the count. This makes it much harder for the
thrower to call a “fast count” when everyone on the field has heard it. For
those who play goaltimate, you understand how this can work as stall outs are
much more common. I believe that this is not really because of the shorter
amount of time (5 seconds), but because everyone on the field hears the stall
count—taking away the cheap “fast count”.
Another little trick that I like is to start close to the thrower at stall 1-3
and then back up as the count gets higher. This eliminates the cheap foul call
at a high count to bail a thrower out. When I say back up—I really step off so
that the thrower cannot even reach out and touch me.
When marking a very adept low break-force thrower I back up a lot as well.
This cuts down on their throwing angle and helps me take away down field cuts.
Some will argue that you need to be close to the thrower, but I have found
over the years that top level throwers will have no trouble stepping through a
close mark, throwing a perfect throw, and getting insurance on a cheap foul
call.
For hammer throwers, you need to be very close and in their face so that they
cannot survey the field effectively.
For huckers, you need to be very close as well—in their “kitchen”, so to
speak, to prevent the big wind up and release.
Finally, and maybe most importantly, I have found as a marker I can help play
downfield defense. All you have to do is keep half an eye on the downfield
cutters. You can see when someone is coming in wide open, and your added
vision of the field makes that throw more difficult. This works the best at a
high count on a handler. You know that the thrower has committed to the dump.
Instead of standing like a lump “forcing flick”, get active and help your
teammate shut down the dump. Remember that you only have to be within 10 feet
of the thrower to be “marking”. You can play a lot of defense in a 10-foot
radius.
Brett Matzuka
The most common mark you see on the frisbee field is what I would define as a
preventative mark. The mark has each arm extended out fully, explicitly placed
to take away a specific throw. This is a useful mark as it does prevent the
intended throws and it is seen at every level of frisbee (see photo 1).
However, though it is useful, it has certain disadvantages. It allows the
thrower to know which throws you are trying to take away before they even
attempt to throw or fake. This will allow the thrower to find the gaps in the
mark and exploit them. Looking over the Japanese mark, you can see that the
thrower has yet to initiate a throwing motion, or fake, and the mark already
has her arms fully extended. The thrower can now find the gaps and use these
for release points in her throw.
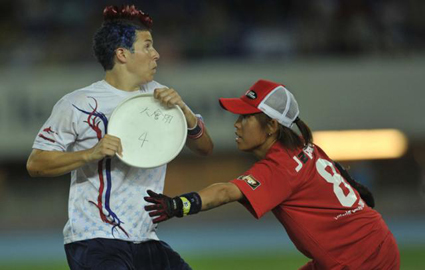
Photo 1
What I find helps to apply more pressure to throwers on most levels is what I
would call a deceptive mark. Instead of fully extending your arms out in a way
that gives the thrower knowledge on what you are trying to prevent, keep your
arms closer to your sides, ready to pounce out once the thrower has committed
to a throwing motion. As can be seen, Thomas Ward of NC State, and Ring of
Fire, has his arms close to his sides and ready to strike once the thrower has
committed to an option. Since they are tight to his side while the thrower is
not in a throwing motion, this does not allow the thrower to find holes and
gaps in the arms to exploit as before. While it does not guarantee that you
will prevent the respective throw you are trying to stop every time as the
previously mentioned mark will (having your arm constantly up to prevent a
high release will certainly stop it, but may give up other throws), it will
force the thrower to work harder to get a throw off (they may try to throw a
inside break backhand and your hand appears, which makes them work harder by
faking multiple times to get the option they want).
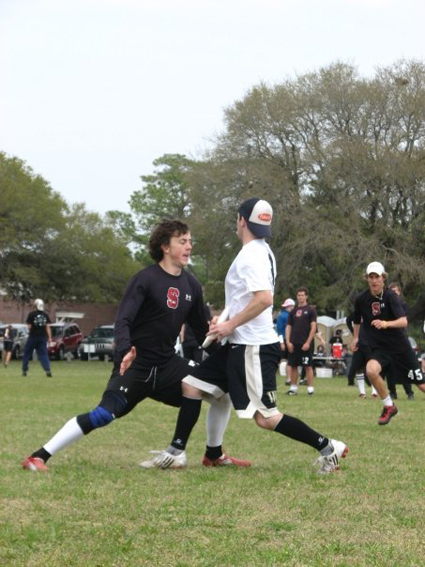
Photo 2
In general, a foot block is not earned by constantly holding your foot in the
air where you think they will release it, but by executing right when they
enter into their throwing motion. This same idea can be utilized with your
arms, and is useful, to apply more pressure to the thrower.
Charlie Reznikoff
When marking, face to face, one-on-one with your opponent, you are more closed
off from the game around you than at any other moment in Ultimate. This leads
some markers to try for too much, going for every block. Others miss
opportunities to help their teammates by adhering too closely to the force.
Effective marking requires a balance between these extremes. One trick to
achieving this balance (and knowing when to take a risk on the mark) is
glancing over your shoulder at the oncoming cuts. A quick look behind you
helps you not to bite on fakes. You can prioritize which throws to take away.
You’ll have the opportunity to help a roasted teammate. And you’re much more
likely to get a block.
A common example of this occurs after a deep pass is caught near the end zone.
The defender, just taken deep, is often frantic, frustrated, and wants to get
the defense personally. He may mark wildly, lunging for every fake. In doing
so he makes end zone defense impossible for his teammates, and makes a goal
more likely. Conversely, some defenders will mark conservatively, doing only
what was agreed-upon before the point. Yet in this scenario, cutters commonly
have a step on their defenders and conservative marking nearly guarantees a
score. A well-timed strike of the mark would save the goal.
In Ultimate, finding the cutters and adjusting the mark accordingly gives the
defense a huge advantage. Ideally the mark is not a one-on-one match up, but
team defense, like a zone, requiring communication and vision.
Gwen Ambler
There are a lot of marking tidbits I’ve heard and dispensed over the years. I
find myself repeatedly coming back to four in particular. Two of these pieces
of wisdom have come from amazing coaches, one is from a legendary point-block
machine, and one is from observations of what makes the biggest difference in
my own marking.
From Jennifer “JD” Donnelly (while coaching Stanford Superfly): Your mark
should take into account body mechanics and reaction time. Keeping your
center of gravity low (bending at the knees, not the waist) helps you stay
balanced on the mark. You can move your feet quicker if your weight is on the
balls of your feet rather than your heels. It is quicker to move your arms
upwards than downwards. It is easier to move your arms quickly from a neutral,
relaxed position than from a fully extended, outstretched position. You can’t
take away a throw from below your knees with your hands while still staying
balanced (use your feet instead). You’ll have more time to react to a throw if
your hands are in the same plane as your body rather than in-front of your
torso.
From Matty Tsang (while coaching Fury): A good mark “sets the table” for
your teammates to get blocks downfield. Actually, as a very team-D-oriented
thinker, he emphasizes that playing good D anywhere on the field can help your
teammates get blocks. As it applies to marking, setting the table for your
teammates means holding the force (or at least making break throws very hard)
at a minimum and ideally also pressuring big open-side throws to influence the
thrower into throwing a pass that was not what she initially envisioned. If
you do your job on the mark, you allow your teammates the opportunity to make
plays downfield on passes that are less than perfectly executed or are thrown
somewhere the D is anticipating. You don’t need to get a point-block to
generate a turnover.
From Mike Whitaker (during a clinic with Team USA): Move your feet according
to a “marking triangle” to best hold the force. Whit is an excellent marker,
partly because of amazing reflexes, but more importantly because he moves his
feet well to the positions that are most likely to help him shut down the
break side. The marking positions that can best stop breaks are NOT along a
straight line, in one plane with the marker’s initial body positioning.
Instead of exclusively shuffling back and forth along a straight line, the
best markers vary the distance between themselves and the thrower (often
dependent on the stall count). In order to stop yard-gaining breaks, Whit
advocates using a drop-step shuffle to hit the corners of an imaginary
triangle behind the mark. By dropping back and out to the side, the marker
prevents a good thrower from simply stepping through the mark for a break and
also allows the marker time to react to any break-mark throw that is
attempted. I only wish I’d started practicing this marking triangle technique
earlier. My personal marking mantra: Work your hardest while on the mark.
There is never a time for resting while you’re on the mark and the disc is in
play.
Sometimes working hard on the mark is physical and sometimes it’s mental, but
it should always be intense. You should have your most fierce focus of the
point while marking. You should be constantly ready to adjust and readjust the
positioning of your body and limbs. You should be ready to move your feet with
quick agility and engage your core to maintain balance whether you’re marking
the first pass of a point or a pass after twenty minutes of a point. My best
marking has always been after reminding myself that marking should be hard
work.
Each of these pieces of advice can be tweaked according to the angle of the
force and other specific situations, like a particular thrower. For instance,
when marking a thrower like Kath Ratcliff, who has a quick high release
backhand, you would want to keep your right hand higher than usual (slightly
higher than shoulder level). But you would still want to keep your arm in a
relaxed position and you’d still want to drop-step back while trying to cut
off that throw. Alternatively, if you’re guarding a thrower like Julie Baker,
who has a ridiculously low-release flick, you might take a general step off to
prevent her from stepping past you, and you would need to be prepared to flash
your left foot to stop her signature throw. But you would still need to stay
balanced and move your feet. On the other hand, if you’re trapping an insecure
thrower on the forehand sideline, you might eschew drop-stepping against the
unlikely threat of a yard-gaining backhand break and instead shuffle to the
right, parallel to the sideline to make even a yard-losing backhand break less
easily executed. But you would still need to maintain your intense focus and
readiness for any break throw she might attempt. Paying attention to the
preferred breaks of throwers can certainly help prepare you for setting a
killer mark.
Peri Kurshan
When the disc is dead, always check behind your back to see where the first
threats are and position yourself to take those away most effectively. It’s
the one chance you have to see what’s about to happen behind you before you
set up your mark—use it!
I try to think of my arms and legs separately as a ’two-pronged’ defense.
Think of your arms as being on a separate vertical plane from your legs, so
that the thrower has to get through 2 vertical planes of extremities rather
than just one. Stand in marking form, with your arms outstretched, then step
your break side leg slightly back. Now when you are marking, it is
psychologically harder for the thrower to throw under your arm because they
can’t tell where your leg is (they know it’s farther back than your arm).
Vary your distance from the thrower. If you are always in the same place the
thrower has 10 seconds to plan out a way to break your mark. I like to start
out marking closer, and then as the count gets higher I move slightly
backwards, and eventually stand up straighter. This minimizes the chances that
I’ll foul the thrower on a high stall count, changes the way in which they
have to throw in order to break me midway through the stall count, and
standing up taller puts me in better position to stop Hail Mary hucks on stall
9.
As a mark, you can’t take away everything. Study your thrower. Try to mark up
on the same person over and over again, figure out what they like to do best,
and then take that away. Force them to throw something they are slightly less
comfortable with. Hopefully that throw will be less well-calibrated and less
expected from their teammates and result in a few miscues.
Patrick Mooney
As a player who is in all honesty not the most gifted and speedy athlete in
the game, getting defensive turnovers with monster layouts and big skies is
not always the best strategy for me. I learned early on however that I can
still have a huge effect on the defensive side of the game by simply focusing
on putting on a solid mark on the player I’m covering (or trying to cover)
once they have the disc. Here are some of the tricks I use and some of those
I’ve seen others use with success.
1. Don’t use the marks as a time to rest. Be active.
Too many players, at all levels of the game, use the mark as an opportunity to
rest for 10 seconds in order to conserve some energy for their next trip out
into the lanes. The trick is to do both; catch your breath while marking hard.
Deep breaths and energy recovery and a focused mark are not exclusive events.
Each stall count affords you a great chance to take a nice deep breath and all
the while you can keep those arms and legs moving.
2. Consider your distance from the thrower.
One of the things I focus on during every marking opportunity is controlling
my distance from the thrower. It’s a lesson I learned early on playing college
ultimate against more experienced guys who would tell me to stop dry humping
their leg for 10 seconds every time I marked them. I would crash the mark and
stay in close while clutching and grabbing at the disc every opportunity I had
thinking that an aggressive mark is a good mark. This isn’t always true and
often leads to foul calls all game, or at inopportune times late in the stall
count. Here is my default strategy for maintaining proper distance now that I
have a bit more experience:
Early stalls (1-3): Crash the mark and keep your distance close. Some might
say this is a blatant infraction of the rules, but at the elite level it is
common and widely accepted. Good throwers will take this as an opportunity to
take an uncontested shot and good defensive players use this as a way to take
away an easy look and to slow the offense down a bit.
Middle stalls (4-7): Back up a bit and get active. Move your feet and hands
and act like the disc is a fly and your hands and feet are fly swatters. Be
aware of your surroundings and the throwers best options, and do your best to
make them think twice.
High stalls (8-10): Give extra room to avoid a crafty veteran player from
looking to generate contact and a foul but don’t stop applying pressure
especially against weaker throwers. These are the stalls where I feel a marker
can be the most dynamic.
3. Know your opponent. Studying a team, and more specifically the exact
match-ups you are going to have against a given team in a given game, to gain
knowledge of throwing habits as well as strengths and weaknesses in advance
will help you a great deal in planning your marking strategy. When I watch
UltiVillage clips (shout out to Rob) or when I’m playing these teams and
players these are some of the things I consider:
-
Q1: Does this team or player rely on making big breaks to run their offense?
-
Q2: Does he/she look for contact and cheap fouls at high counts?
-
Q3: Does he like his flick bomb or his backhand?
-
Q4: Do they like to throw and go, or do they want to hold the disc and look for a bigger and better option?
-
Q5: Are they a strong or weak thrower?
When you start to be more thoughtful and proactive when it comes to marking
you can start to apply a great deal of pressure with your mark—no matter who
you are playing against.
4. Don’t be afraid to be more dynamic on the mark.
At the start of every point of every game we are told what the force is, and
as anyone playing elite ultimate knows, good team defense relies on holding
that force. However, too often I see players give up easy throws at late
counts just because they are doing what they “should do.”" Some of the best
markers, in my opinion, will abandon the force at late stall counts and high-
pressure situations to stay with the thrower and try to take away his best
option in an attempt to make them turn up field at stall 8 and throw something
they didn’t want to. This is especially true of weaker throwers. Use your
brain, be smart and take chances to force high-pressure looks for the offense.
Force your opponent to make the one throw he is least comfortable making.
If every player on a team marks effectively, forcing the opposition to make
numerous high pressure decisions and throws, it allows all the other players
on their team to have a better chance at making the big play or their
opposition to make a bad one. Good team defense begins with the mark.
Lou Burruss
Once you’ve mastered the basics (like the two-spot mark) and the not-so-basic-
but-standard (like denying the dump on stalling 8), it’s time to move on to
learning individual players.
Of course you know all the moves of your nemesis; you play him five times a
season and cover him every point you’re in. Of course you adjust your game to
meet the challenge. Your match-ups become games within games within games
where the slightest mistake yields victory. But I’m not talking about him. I’m
talking about the guy you’ve never seen. The guy on that team from somewhere
who is suddenly lighting you up. How do you stop him? You’ve got to know him
and the faster you can know him, the faster you can deal with him.
The trick is to pay attention. The first time you see someone make a throw
they’ve told you something. What you are looking for is that special throw,
that game changer. The first time you see someone make this kind of throw,
take note. The second time you see the throw, you know they’ve got it. Now go
take it away. Do they have a forehand huck? Play flat and tight and get a hand
out there early. Do they have a step-around backhand? Be ready to take that
big hop back and away, then close back in. The particulars don’t matter. What
matters is that you take away something they’ve proven they can do.
Twice, no more.
As always, you can contact me at louburruss@gmail.com.
Matt Dufort
Marking consists of two simple steps: knowing the threats, and denying the
threats. While the specifics will depend on how your team decides to play
defense, the ideas below will apply in nearly all situations.
Step 1: Know the threats.
The best way to adjust your mark is to anticipate what the offense wants to
do. If you can read the offense, you can take away the throws that would help
them the most. Here are the key things to know:
1 Position on the field. Where you are on the field changes the threats,
and should change how you mark. Every time you set up a mark, you should take
a moment to get your bearings on the field.
2. Thrower’s abilities. If you’re covering a team’s top thrower, you’re
likely to be focused on stopping hucks and dangerous break throws. But if
you’re marking a good athlete with weak disc skills, the biggest threat may
just be that they get the dump off. Pay attention to their comfort with the
disc, the throws they’ve made before, and what their teammates look for when
they have the disc. If it’s someone you match up against frequently, watch
video to learn their moves, and visualize how you’ll stop those moves.
3. Position of other players on the field. Knowing where the cutters are
can make marking much simpler. You don’t have eyes in the back of your head.
But take a quick glance around as you set up the mark, keep an eye out for
cutters in your peripheral vision, and get your teammates on the sideline to
tell you where the potential receivers are.
4.Reading the thrower. For all but the best throwers, it’s possible to
tell when and where they’re going to put a throw up. Focus on their eyes and
hips—few people have effective no-look throws, and if their hips move, the
rest of their body will too. DO NOT focus on the movement of their head,
shoulders or hands—these are the easiest parts of the body to fake with.
Step 2: Deny the threats.
If you followed the advice above, you should have a pretty good idea of how
the thrower can hurt you. The next step is to use that knowledge to deny the
threats.
1. Establish and maintain proper positioning. Stay low and active as you
approach, and set up so you can prevent the thrower’s most dangerous options.
With a great thrower, this may be tight and flat to prevent the huck, or low
and a yard away to deny quick breaks. With a weaker thrower, you can more
safely attack the open side and dump throws.
2. Hedge your bets. You want to prevent the thrower’s best options,
without exposing your defense to even bigger problems. Don’t jump so hard on
one fake that you let off an easy break throw. You can’t stop everything, so
focus on preventing the throws that would hurt your defense the most, while
making other options a bit more difficult.
3. Be unpredictable. A good thrower will see a mark’s weaknesses and
exploit them. By constantly changing things up, you can keep the thrower
guessing and force them to look off throws they’d otherwise take. Vary your
distance from the thrower, your side-to-side positioning, and how you move
your hands. Don’t just follow the thrower’s moves—it may take them a couple
fakes, but they’ll burn you. I tend to split a 10-second stall count into 3 or
4 chunks, and change up my mark every 2-3 seconds. I’ll often start tight and
active for 1-3, back off to deny the breaks at 4-5, approach again at 6-7 to
make them uncomfortable, then step back a bit to avoid the dreaded stall-9
foul call.
4. Go for the kill. In elite ultimate, turnovers can be hard to come by.
When you’re marking a weaker thrower, when the stall count gets high, or if
the disc is in a bad position (deep in the end zone or trapped downwind), you
need to take advantage of it. Get active, attack every throw, and don’t make
anything easy. Even if you don’t get a point block, chances are good you’ll
force a turnover.